


How to Create a Video to Text Web App
A video-to-text app using Streamlit + Twelve Labs API


Introduction
In today's digital world, extracting insights from video content is not just useful—it's a game-changer. Enter my latest project: a sleek, web-based app built with Streamlit that transforms your videos into text with ease. Simply upload a short video or drop in a YouTube URL, and voilà! Choose from one of four prompts and watch as the app works its magic to provide detailed summaries, keywords, engaging social media posts, or educational highlights. My motivation was twofold: diving into the impressive Twelve Labs API to get hands-on experience with multimodal AI and indulging my enthusiasm for using Streamlit for the first time. This project not only showcases the power of advanced AI but also highlights the simplicity and effectiveness of Streamlit in creating interactive applications.
Technology
Video processing: TwelveLabs API
Web app: Streamlit
Programming language: Python
Video Downloader: yt-dlp package
What is Video-to-Text?
Video-to-text technology converts videos' visual and audio content into written text, leveraging a variety of computer vision and natural language processing techniques to interpret and present the information in a readable format. Sample use cases for such a task can be content summarization, keyword extraction from the videos, and social media posts where one can generate engaging posts based on the video content, making it easier to share insights and highlights.
Why Twelve Labs API?
There are many different algorithms available to perform this task, such as Amazon Transcribe, OpenAI’s Whisper and GPT models, and Twelve Labs API. Twelve Labs released a video-language foundation model Pegasus-1 accompanied by an API suite of Gist API, Summary API, and Generate API as seen in the following image. Besides this model's multilingual and multimodal understanding, its performance against the other SOTA video-language model showed a significant step up. Additionally, I found an article by Michael Shim that shed good light on why Twelve Labs is heading towards building not only a progressive multimodal foundation model but also a developer-friendly platform.
Pegasus architecture involves 3 models: video processing by Marengo, video-language alignment model, and lastly, large language (decoder) model. For more detail, the report explains the architecture extensively.

Why Streamlit?
Streamlit stands out as the go-to framework for building this video-to-text application due to its simplicity, flexibility and speed. Unlike traditional web development frameworks, Stremlit allows developers to create interactive, data-driven web applications with minimal effort. Its intuitive API lets you turn data scripts into shareable web apps in minutes, without the need for extensive front-end development knowledge. For this project, Streamlit’s seamless integration with Python, ease of handling file uploads, and real-time data display capabilities made it the perfect choice. Additionally, its support for state management and customizable UI elements ensured that the application could provide a smooth and engaging user experience. Whether you are a data scientist or a software developer, Streamlit’s capabilities make it an indispensable tool for transforming complex data workflows into user-friendly applications.
Now that we understand this project, let’s get into the technical implementation.
Initialization and Configuration of Twelve Labs API
The first step is to get your API key from Twelve Labs Playground. This is where you manage the Streamlit session state for generated content and the video index. Session state lets you share variables between various reruns for each user session. This helps maintain the steady state of the web app page and manage multi-page applications. Since it is beyond the scope of this blog, I will not explain the session state, but you can check out the documentation for more information.
# Hard-coded API key
API_KEY = "Your-API-Key" # Replace with your actual Twelve Labs API key
client = TwelveLabs(api_key = API_KEY)
# Initialize session state for generated content and index
if 'generated_content' not in st.session_state:
st.session_state['generated_content'] = []
if 'index_id' not in st.session_state:
st.session_state['index_id'] = None
Since this is a Streamlit web application, you can add a custom CSS block to your main code to enhance the application's visual appearance as follows:
# Injest css for background
def local_css(file_name):
with open(file_name) as f:
st.markdown(f'<style>{f.read()}</style>', unsafe_allow_html=True)
local_css("style.css")
NOTE: “style.css” is a separate script which I won’t cover in this blog post but you can find it on my GitHub repo.
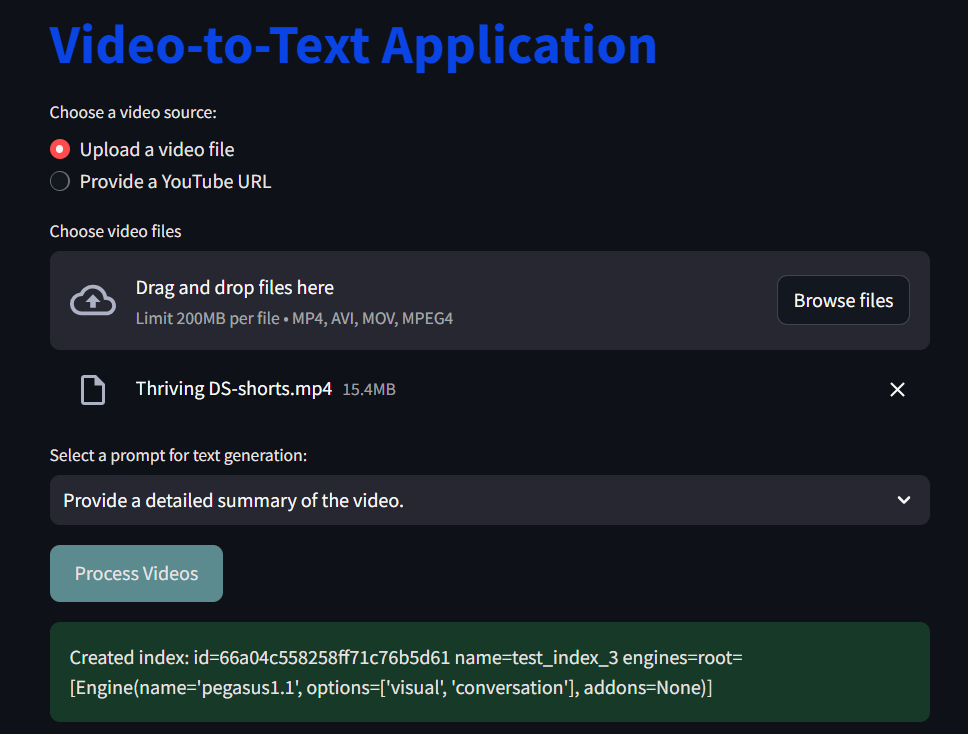
Creating Index
An index is a basic unit that you can use to retrieve information from your video database. With any index, you can group similar videos and perform various other index operations, as explained in this documentation. Creating an index is straightforward. You need to make sure that your index is in the current session state, then you pass the name of the index and the engine options to index.create() as seen in the following code snippet:
# Function to create an index if it doesn't exist
def create_index(client):
if st.session_state['index_id'] is None:
try:
index = client.index.create(
name = "test_index",
engines=[
{
"name": "pegasus1",
"options": ["visual", "conversation"],
}
]
)
st.session_state['index_id'] = index.id
st.success(f"Created index: id={index.id} name={index.name} engines={index.engines}")
except Exception as e:
st.error(f"Failed to create index: {e}")
One thing to note when creating an index is every time I ran the application, I had to change the index name by hand.
At the beginning of the post, I mentioned that you can either upload a video (up to 200 MB) from your local machine or use a YouTube URL. For YouTube URLs, you need a way to download the videos and store them temporarily, for further processing. To accomplish this, I used yt-dlp:
# Function to download YouTube video
def download_youtube_video(url):
try:
video_path = 'downloaded_video.mp4' # Adjusted for Windows environment
ydl_opts = {'outtmpl': video_path}
with yt_dlp.YoutubeDL(ydl_opts) as ydl:
ydl.download([url])
return video_path
except Exception as e:
st.error(f"Failed to download YouTube video: {e}")
return None
Once you upload a video or download it from the YouTube URL, the next step is to upload it to Twelve Labs API and create a task to process the video.
# Function to upload video to the existing index
def upload_video(client, video_source, is_url=False):
try:
task = client.task.create(index_id=st.session_state['index_id'], file=video_source, language="en")
st.success(f"Created task: id={task.id}")
except Exception as e:
st.error(f"Failed to create task: {e}")
return None
progress_bar = st.progress(0)
status_text = st.empty()
while True:
task_status = client.task.retrieve(task.id)
status_text.text(f"Status: {task_status.status}")
if task_status.status == "processing":
progress_bar.progress(50)
elif task_status.status == "ready":
progress_bar.progress(100)
break
elif task_status.status == "failed":
st.error(f"Indexing failed with status {task_status.status}")
return None
time.sleep(5)
if is_url:
st.success(f"Uploaded video from URL. The unique identifier of your video is {task.video_id}")
else:
st.success(f"Uploaded {video_source}. The unique identifier of your video is {task.video_id}")
return task.video_id
Text Generation Using Prompts
I wanted to add more usability and creativity to the application. I wanted to test how the LLMs from the Twelve Labs API generate text output based on the uploaded video. That’s why I enabled four different prompts that the user can select from. This could be done in many ways, such as having one detailed prompt or creating more specific prompts based on the use case. For my project, I had the following four options to choose from:

For each of the prompts, you call the relevant Twelve Labs API endpoints. For instance, for summarizing tasks, you call client.generate.summarize, whereas for text generation, you call client.generate.text, and so on. For more details on the endpoints, check out this documentation. The code snippet looked like this:
# Function to generate text for video
def generate_text_for_video(client, video_id, selected_prompt):
content = ""
try:
if selected_prompt == "Provide a detailed summary of the video.":
res = client.generate.summarize(video_id=video_id, type="summary")
content = f"**Summary**: {res.summary}"
elif selected_prompt == "Generate important keywords.":
res = client.generate.gist(video_id=video_id, types=["title", "topic", "hashtag"])
content = f"**Title**: {res.title}\n\n**Topics**: {', '.join(res.topics)}\n\n**Hashtags**: {', '.join(res.hashtags)}"
elif selected_prompt == "Create an engaging social media post based on the video.":
res = client.generate.text(video_id=video_id, prompt="Based on this video, create an engaging social media post. Can you also give any relevant suggestions for the user?")
content = f"**Social media post**: {res.data}"
elif selected_prompt == "Suggest educational insights from the video content.":
res = client.generate.summarize(video_id=video_id, type="highlight")
for highlight in res.highlights:
content = f" **Highlight**: {highlight.highlight}\n Start: {highlight.start}, End: {highlight.end}"
except Exception as e:
content = f"Error generating content: {e}"
st.session_state['generated_content'].append(content)
# Streamlit app interface
st.title('Video-to-Text Application')
upload_option = st.radio("Choose a video source:", ("Upload a video file", "Provide a YouTube URL"))
if upload_option == "Upload a video file":
uploaded_files = st.file_uploader("Choose video files", type=["mp4", "avi", "mov"], accept_multiple_files=True)
else:
youtube_url = st.text_input("Enter YouTube URL")
predefined_prompts = [
"Provide a detailed summary of the video.",
"Generate important keywords.",
"Create an engaging social media post based on the video.",
"Suggest educational insights from the video content."
]
selected_prompt = st.selectbox("Select a prompt for text generation:", predefined_prompts)
Video Processing
The last bit before working on the user interface is to make sure that you process the uploaded videos whether the locally uploaded videos or through YouTube. The following function ensures that the index is created, the video is uploaded, and the text is generated.
def process_videos(uploaded_files, youtube_url, upload_option, selected_prompt):
create_index(client) # Ensure the index is created
if upload_option == "Upload a video file":
for uploaded_file in uploaded_files:
st.video(uploaded_file)
video_id = upload_video(client, uploaded_file)
if video_id:
generate_text_for_video(client, video_id, selected_prompt)
elif upload_option == "Provide a YouTube URL" and youtube_url:
video_path = download_youtube_video(youtube_url)
if video_path:
video_id = upload_video(client, video_path)
if video_id:
generate_text_for_video(client, video_id, selected_prompt)
os.remove(video_path) # Clean up downloaded video file
Streamlit User Interface
This part is where you connect everything we did above to enable better user interaction. I also added a small section for user feedback. Please note that the feedback is not stored anywhere; I just had a lot of fun learning Streamlit, so I added this piece.
if st.button("Process Videos"):
if upload_option == "Upload a video file" and uploaded_files:
process_videos(uploaded_files, None, upload_option, selected_prompt)
elif upload_option == "Provide a YouTube URL" and youtube_url:
process_videos(None, youtube_url, upload_option, selected_prompt)
# Display generated content
if st.session_state['generated_content']:
st.write("### About the Video")
for content in st.session_state['generated_content']:
st.write(content)
# User feedback section
st.header("Feedback")
rating = st.radio("How would you rate the generated content?", ("Excellent", "Good", "Average", "Poor"))
feedback = st.text_area("Any additional comments or suggestions?")
if st.button("Submit Feedback"):
st.success("Thank you for your feedback!")
Even though I do not have the feedback storage functionality, the way one can build it is:
Choose a Database: Select a suitable database
Set Up the Database: Create a table for feedback with columns for id, rating, feedback_text, timestamp, etc., and initialize the database connection in your Streamlit app.
Retrieve and Display Feedback: Add functionality to query the database and display the stored feedback in your app.
Analyze Feedback: Optionally, implement features to analyze feedback, such as generating summary statistics or visualizing trends.
Here is a sample output for you when I selected to upload a video locally:


Future Steps
You can explore this task in many ways. For instance, I’d love to add multi-page functionality where you can see the option to upload the video on the landing page, and then submit it. It would then take you to the next page to display the results. You can also make the UI look prettier and more user-friendly. Another enhancement could be the ability to add multiple videos and generate content based on them. This is a fun project where you can learn about various APIs and how they interact with each other. You can also add a vector database component to enable vector search. If you have more ideas, please feel free to comment or DM me.
You can find the code: GitHub
Happy building!